MIMAKI UJF-6042MkII NCU ERROR CURE
Troubleshooting “REPLACE NCU” (Error 651) — Step-by-step resolution from sensor decontamination to bypass and hardware replacement.
Understanding the NCU (Nozzle Check Unit) & Error 651
The Nozzle Check Unit (NCU) is an opto-electronic sensor situated under the right side maintenance cover (adjacent to the capping station and wiper). It uses an optical LED beam to automatically detect deflected or missing ink droplets during auto-cleaning routines.
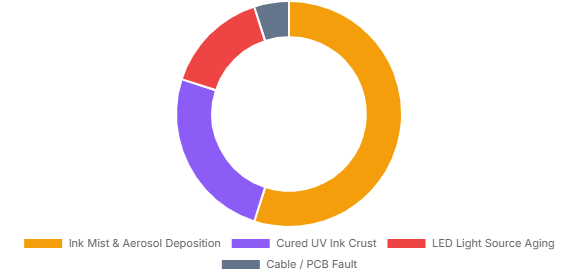
Continuous high-speed UV jetting creates microscopic aerosol mist that settles on the NCU’s optical emitter and receiver lenses over time.
Stray UV curing light or ambient room lighting cures ink droplets deposited inside the NCU sensor trench, physically blocking the optical path.
After extended operation hours, the infrared LED light emission level naturally drops below the internal detection threshold triggering Error 651.
Action Protocol: How to Cure the “Replace NCU” Message
Deep Sensor Lens Decontamination (First-Line Cure)
Action: Open the right clamshell cover. Locate the small NCU block on the left side of the capping station assembly.
- Put on safety gloves and eye protection.
- Dampen a genuine Mimaki SPC-0386 clean swab with Maintenance Liquid 11 (ML011) or F-200 / LF-200 solution.
- Gently wipe the light-emitting glass and receiver sensor apertures inside the NCU groove.
- CRITICAL: Do NOT use isopropyl alcohol or aggressive unapproved solvents that damage optical plastics!
- Use a dry swab to absorb residual liquid and ensure zero lint filaments remain behind.
Execute NCU Sensor Sensitivity Check & Recalibration
After cleaning, verify if the light intensity value has recovered to normal operational levels:
Workaround: Disable NCU Auto-Check for Emergency Production
If an urgent print job must be completed before a replacement NCU module arrives, you can temporarily disable the NCU auto-check function:
Note: When NCU is OFF, inspect print quality manually by running nozzle test patterns prior to big production runs.
Physical NCU Module Replacement Procedure
If cleaning and calibration fail to clear Error 651, the optical LED emitter is permanently degraded and requires module replacement:
- Power down the UJF-6042MkII and disconnect the main power cable.
- Open right maintenance door to access the station area.
- Unscrew the two mounting screws securing the NCU bracket.
- Carefully disconnect the flexible flat cable (FFC / ribbon connector).
- Mount new genuine Mimaki NCU unit, reconnect FFC securely, reassemble, power ON, and run NCU sensitivity calibration.
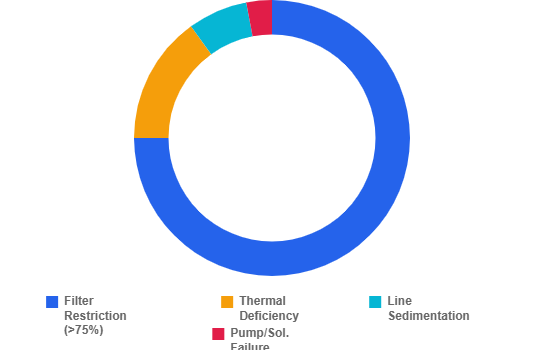
Error 651 Root Cause Distribution
Historical field data analysis for Mimaki UJF series NCU warnings.
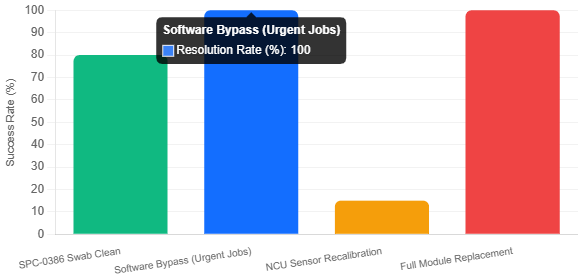
Resolution Method Success Rate
Effective field service actions to restore printer readiness.